Sales tickets are automatically created when the client is checked in. All services and their prices set in the employee's assigned services are shown. Use the buttons on the ticket to add/remove products, services and specials, access the client and their appointment log, attach or move tickets, and prebook their next appointment.
*updated video coming soon!
1. Begin by clicking on the client's appointment on the Schedule, then click "Show Ticket"
Add/Remove Services:
A client may get an extra service that wasn’t on the Schedule, or not have gotten a service that was initially scheduled. Just click the red.png?width=22&name=rtaImage%20(5).png)
 icon next to a service to remove it from the ticket, or click the
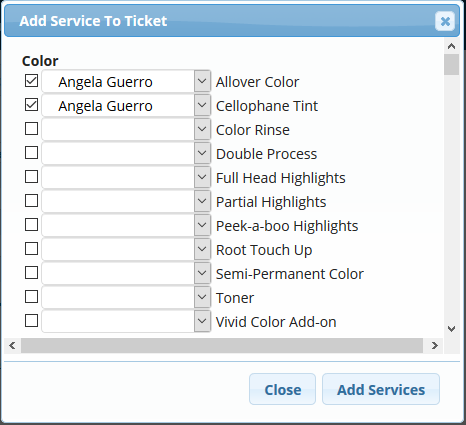
.png?width=21&name=rtaImage%20(1).png) button next to Services to add additional services to the ticket.
button next to Services to add additional services to the ticket.

Add Products:
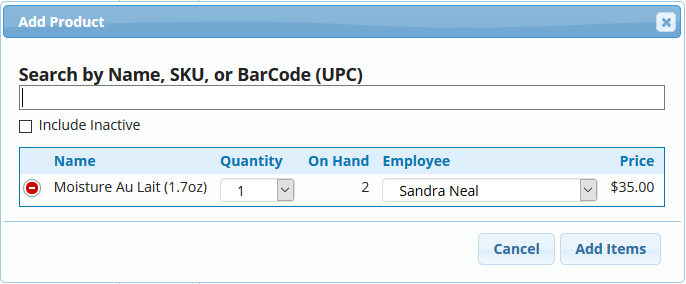
There are a few different ways to add a Product to a ticket. If there are Promotions set up for services the client received that day or if there are Use Up Days set up for a product the client purchased in the past, you will get a reminder at the top of the ticket with a button next to it to add the product to the ticket.
- If there are no reminders or promotions at the top of the ticket, you can add products by also clicking the icon next to Products.

Add Gift Cards:
Click the next to Gift Cards. Enter your gift card code and the amount that it is worth. Then click Add Gift Card. Follow this separate article for more detailed instructions: Gift Cards
Add Membership:
Click the next to Memberships. Select one of your memberships to sell by clicking the arrow or search for it using the search field. Choose when it starts and Add Membership. Follow this separate article for more detailed instructions: Selling/Redeeming Memberships
Add Package:
Click the next to Packages. Select one of your memberships to sell by clicking the arrow or search for it using the search field. Choose when it starts and Add Package. Follow this separate article for more detailed instructions: Selling/Redeeming Packages
Attach a Ticket:
This combines two or more tickets for payment by one person (for instance, a mother and daughter both get haircuts, and the mother wants to pay for both transactions at once). There will be a separate ticket for each individual, and then you'll attach them with this button at check-out.
Follow the simple instructions here: Attaching a Ticket
Move Ticket:
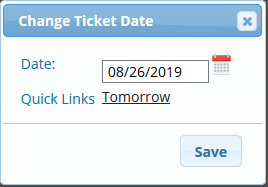
It’s sometimes necessary to move a ticket to a future date for payment, (for instance, when an appointment goes overtime and you’ve already balanced the cash drawer.) Click Move Ticket, select a date for payment, (or use the “tomorrow” quick link), then click Save.

Appointment Log:
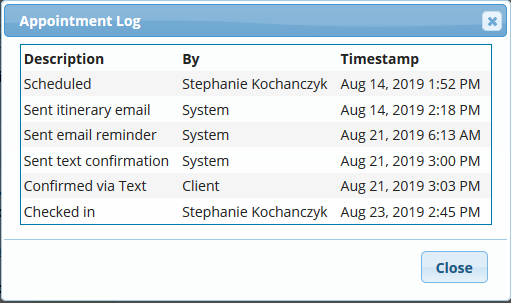
This will provide you with Timestamps to track what was done, when, and by whom from the moment the appointment was Scheduled to when their Ticket was closed, (and even whether or not their ticket was re-opened).

Prebook:
Many regular clients like to book their next appointment before leaving, especially in very busy salons or during holiday seasons to insure they’ll get the date and time they want. For more details see, Prebooking Appointments.
Client Log:
The Client Log is a convenient tool that allows you to provide the personal touch for great customer service. It’s a record of the client’s past services and product purchases, future appointments, memberships and/or packages, gift cards, notes, and formulas.
Discounts:
You may discount any service or product within a ticket. This method of discount will adjust the employee's compensation. There are a couple additional ways to apply a discount depending on the situation and reason for the discount. (Please see our "Applying a Discount" article for more details)
2. Once you are finished with any adjustments the ticket may need, you can proceed to the "Collect Payment" tab to complete the checkout process.
*updated video coming soon!
1. Begin by clicking on the client's appointment on the Schedule, then click "Show Ticket"
Add/Remove Services:
A client may get an extra service that wasn’t on the Schedule, or not have gotten a service that was initially scheduled. Just click the red
Add Products:
There are a few different ways to add a Product to a ticket. If there are Promotions set up for services the client received that day or if there are Use Up Days set up for a product the client purchased in the past, you will get a reminder at the top of the ticket with a
- If there are no reminders or promotions at the top of the ticket, you can add products by also clicking the
Add Gift Cards:
Click the
Add Membership:
Click the
Add Package:
Click the
Attach a Ticket:
This combines two or more tickets for payment by one person (for instance, a mother and daughter both get haircuts, and the mother wants to pay for both transactions at once). There will be a separate ticket for each individual, and then you'll attach them with this button at check-out.
Follow the simple instructions here: Attaching a Ticket
Move Ticket:
It’s sometimes necessary to move a ticket to a future date for payment, (for instance, when an appointment goes overtime and you’ve already balanced the cash drawer.) Click Move Ticket, select a date for payment, (or use the “tomorrow” quick link), then click Save.
Appointment Log:
This will provide you with Timestamps to track what was done, when, and by whom from the moment the appointment was Scheduled to when their Ticket was closed, (and even whether or not their ticket was re-opened).
Prebook:
Many regular clients like to book their next appointment before leaving, especially in very busy salons or during holiday seasons to insure they’ll get the date and time they want. For more details see, Prebooking Appointments.
Client Log:
The Client Log is a convenient tool that allows you to provide the personal touch for great customer service. It’s a record of the client’s past services and product purchases, future appointments, memberships and/or packages, gift cards, notes, and formulas.
Discounts:
You may discount any service or product within a ticket. This method of discount will adjust the employee's compensation. There are a couple additional ways to apply a discount depending on the situation and reason for the discount. (Please see our "Applying a Discount" article for more details)
2. Once you are finished with any adjustments the ticket may need, you can proceed to the "Collect Payment" tab to complete the checkout process.