Proceed to: Manage > Basic Settings > Business Settings
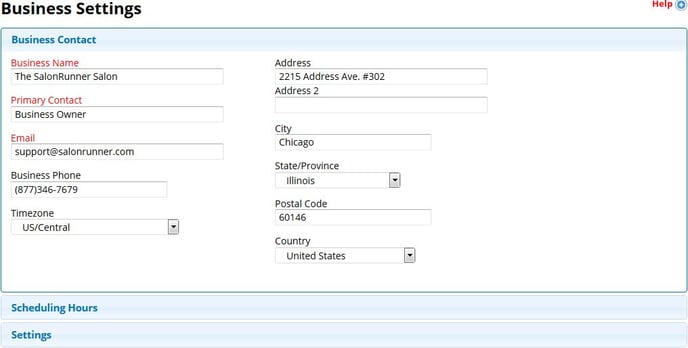
Business Contact
Complete all fields applicable to your business. Some may seem unimportant, but they are necessary in order for the software to function properly.
Notes:
· Be mindful of capitalization, spelling, and punctuation
· Do not skip entering your Timezone
· If you purchased the Client Connect Premium Bundle , your Business Phone number will be included at the end of the texts. Text Confirmations will let the client know they need to call that number to cancel or reschedule. If you leave your Business Number blank, it will simply say they need to call the business to reschedule
Scheduling Hours
This screen reflects your “outer limits” for scheduling appointments. It does NOT determine the regular hours you are open for business.
Notes:
· Choose and set the widest range of times and days in which you can possibly accommodate any appointment
For Example: If you have at least one Service Provider who performs services on Sundays or very late evenings, regardless the business technically being closed at those times, you must include his/her possibilities as a part of your business hours. Failure to do so will result in the inability of opening the schedule to book appointments or close tickets outside of the normal business hours 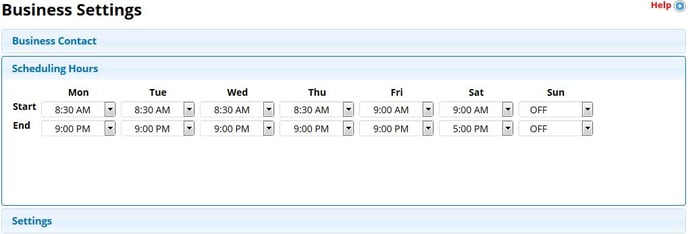
To set your Business Hours:
Select the Start and End time from the drop-down under each day
* If you attempt to change your business hours to be closed during a time you already have an appointment scheduled, you will receive an error message
Settings
Please make sure these are set up correctly to ensure your software is being utilized correctly.
Notes:
· Sales tax must be entered with a decimal point, such as “6.25”
· Service tax is not required if you do not charge tax for services
· If you do not use an integrated credit card processor, your Accepted Forms of Payment will control what fields are available within the Collect Payment screen while checking a client out
· If any Missing Client Data Reminders are set to "Yes", there will be a pop-up upon selecting any client who's missing that information
When Phone Number is set to "Yes", the pop-up will appear if the clients are missing a number in any phone number field 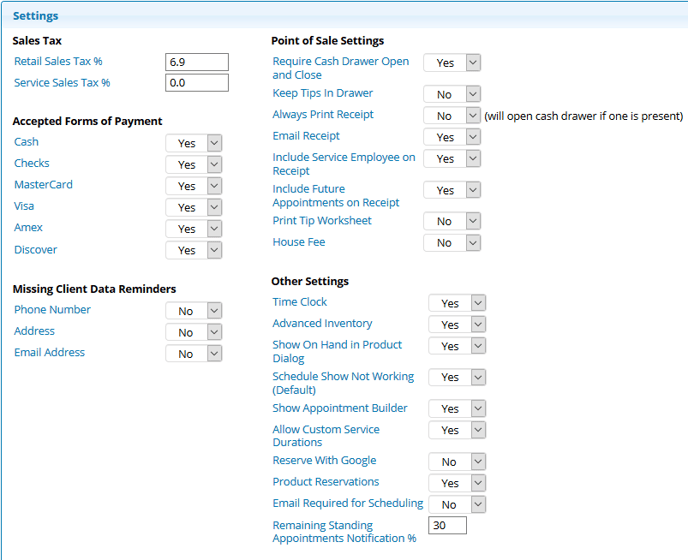
Point of Sale Settings - Overview
Require Cash Drawer Open and Close
- "Yes" will require employees to open their drawer before checking any clients out when logged into their own username
This will assist with tracking who opens a drawer and the time
- "No" will not require a drawer to be open before checking tickets out
Keep Tips in Drawer:
- "Yes": You do not take tips out of the cash drawer to give directly to the Service Provider, but you do include them in their paycheck
Employee's "Track Tips" in their profile settings should also be set to "Yes". This will allow you to assign tips to the appropriate employee(s) at customer checkout so individual records are kept for each employee’s tips
- "No": If you will be removing the tips from the cash drawer to give directly to the employee(s) in cash, even if the tip was left using a card payment
Always Print Receipt: If this is set to "Yes", a receipt will always print after checking out a client, via the print dialog. (This will also open the cash drawer if there is one plugged into your receipt printer, and the settings on your receipt printer are set to do so)
Email Receipt: If this is set to "Yes", there will be a pop-up after checking a client out with an email entry field to send the receipt to
- If the client already has an email in their Client Log, the email will automatically be in that box
Include Service Employee on Receipt: This will list the employee who performed each service on the client's printed & emailed receipt
Include Future Appointments on Receipt: This will list all of the client's appointments currently scheduled for the future at the bottom of their printed & emailed receipt
Print Tip Worksheet: Used as a printable form to allow your clients to add a tip to the transaction without having to verbally ask for it
- Check “Yes” to add a button to your Collect Payment screen. When clicked, it will allow you to print the worksheet. Clients will write down the tip they would like to leave, then give it back to you to add the tip within the Collect Payment screen before completing the transaction
House Fee: A charge deducted from the Service Provider’s commission in order to cover overall salon cost
Other Settings - Overview
Time Clock: If any of your employees use the software to clock in and out, check "Yes"
Advanced Inventory: We Highly Recommend Having this Turned OFF! This will affect how your orders work, and the available fields within the Mass Update page for each product
- "Yes": The following additional fields will be available for each product - Min. to Reorder and Ships in Qy. When creating an order within the software, it will do the math between On Hand, Target, and Min. to Reorder values to get the order amount of each product

Min. to Reorder: (Minimum to Reorder) This is the minimum amount you are required to order at once.
This is better explained by example:
On Hand: 6, Target: 10, Min. to Reorder: 6
- You only need 4 until you reach your Target value, but since the Min. to Reorder is set to 6, the software will not add the product to your order at all until your On Hand value gets down to 4
Ships in Qy: (Ships in Quantity) You'll want to think of this as products that come in boxes. Say, On Hand quantity of 1 (box) contains 4 products within it
Show On Hand in Product Dialog: If set to "Yes", this will show the On Hand value of products within the Product Price Check and Inventory Use screens
Schedule Show Not Working (Default): If set to "Yes", this will default your software to automatically show those who are not working that day
Show Appointment Builder: Single Service Provider accounts will be defaulted to "No".
- When set to "Yes", you'll have an additional icon at the left of your schedule to quickly search openings that will fit one or multiple services requested by the client
Allow Custom Service Durations: You have the ability to toggle your Custom Service Durations feature on and off. This will stop any pop-ups from appearing when you manually change the default duration of a service upon scheduling.
- When set to "No", the feature is entirely off, you will no longer be able to save a custom service duration for any clients.
- Any custom service duration that was previously saved for any client will remain. However, you would not be able to delete/edit this until the feature is turned back on.
Reserve with Google: If your business is listed on Google, have this set to "Yes" will allow your clients to book online through Google. (Takes 24-48 hours to sync after turning this on.)
Product Reservations: Should be set to "Yes" if you allow your clients to reserve product(s) for the time they come in. Will allow them to do so themselves when scheduling online as well. (See our "Product Reservations" article for more information)
Email Required for Scheduling: This will force you to enter an email address for any client before proceeding
Remaining Standing Appointments Notification %: You are able to set a notification of remaining availability based off of percentage