We highly recommend using Mozilla Firefox or Google Chrome when using a printer and a cash drawer.
Note: If you are attempting to run your business from an iPad or tablet, you'll want the Star TSP143IIIW in order to connect to WiFi simply
Star TSP100 Printer Setup: Wifi
Part 1: Connect your printer to your Mac
You'll need administrator access on your computer to complete this installation.
- Locate the printer's power cord (it comes in two pieces). It can be found in a small white box with the Star Micronics logo on it.
- Locate the USB cable that connects the receipt printer to the computer.
- Plug the power cord into the back of the printer and a power source.
- Connect the square end of the USB cable to the printer.
- Connect the rectangular, slimmer end of the USB cord to your computer.
- Turn on the printer, using the switch on its side.
- Your computer will automatically install the driver. To install manually, follow the prompts as explained in Part 4 below.
- If you see a red error light flashing, load paper (Part 3) before you begin installing.
Part 2: Load paper
One starter roll of 80 mm (3 ⅛ inch) thermal receipt paper is sent with your printer. When the paper runs low, your printer's red error light will begin to flash, and the receipts will print with a pink line down the middle of them.
80 mm thermal receipt paper can be purchased at most office supply stores, and online.
To load more paper:
- Press the open lever on the cover of the printer.
- Gently push the roll into place until it is touching the lower black button. If the lower button is not depressed by the paper roll, the error light will flash.
- Caution! The paper gauges are fragile. If they become detached, then you'll need to take the printer apart in order to reattach the gauges.
- Do not try to feed the paper through the front rollers on the cover. The correct way to load the paper is to make sure the paper comes out from underneath the roll as if you were loading a roll of toilet paper under instead of over. Pull the paper feed out of the printer.
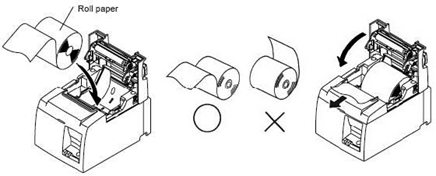
- With the paper feed hanging out the front of the printer, close the cover by pushing it down onto the paper until it clicks.
- Turn the printer on.
Part 3: Feed test
- Turn the printer off.
- Hold down the Feed button on the front of the printer.
- While you're holding down the Feed button, turn the printer on.
- Release the Feed button as the printer begins printing a receipt with its settings.
- If a receipt with settings was printed, then your printer is working correctly.
Part 4: Install the driver
You will need administrator access on your computer to complete this installation.
- Turn your printer on using the switch on the side, and follow the steps below to manually install the driver. If you have already installed the driver, skip to Part 5.
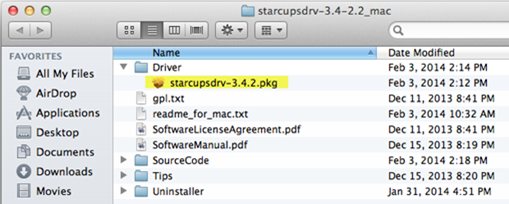
- Click here to download the zip file that contains the drivers to your Mac.

- Once the file is downloaded, open the .zip file found under the Downloads folder on your computer.
- Open the Driver file, and click on the installation file called starcupsdrv.pkg to install.
- Under CUPS 3.3.0 Mac Driver for All Star Micronics Printers, select Download here.
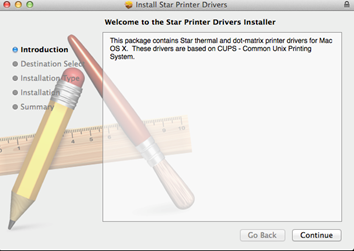
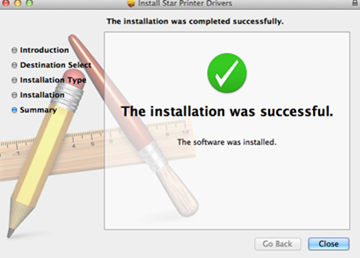
- Follow the prompts for installation. You'll see the following:
Part 5: Add the receipt printer and set the default printer
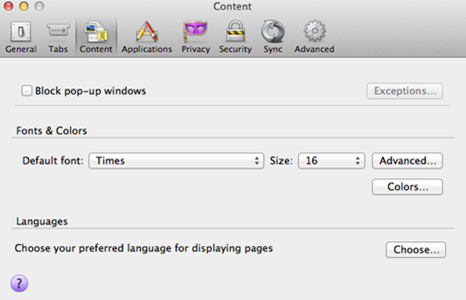
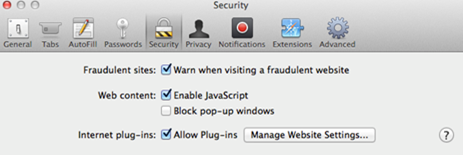
1. Check to make sure the pop-up blockers on your computer have been turned off by opening Preferences from the apple menu in the upper left of your screen.
- Firefox settings:
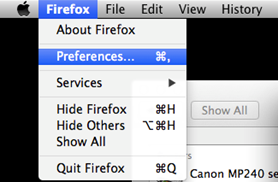
Turn off the pop-up blocker.
- Safari settings:
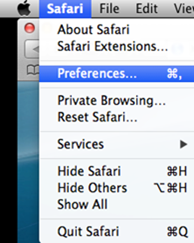
Turn off the pop-up blocker.
2. Add the printer and set it as the default printer:
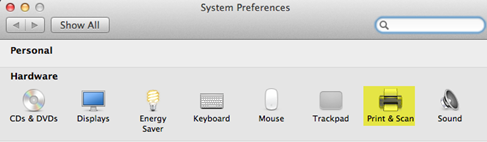
- Go to System Preferences.

- Select Print and Scan.
- Check to be sure the correct printer and driver have been selected.
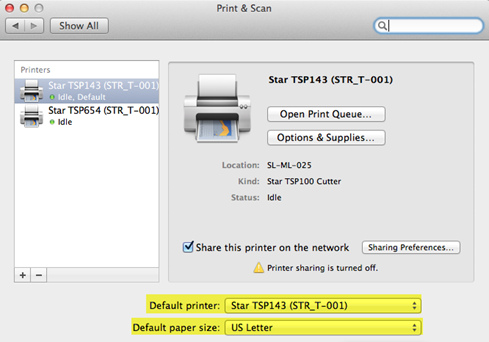
- Select the Default Printer, Star TSP143 (STR_T-001) printer, or search for it in the search bar.
- Make sure the name of the printer is selected; the location should be the name of your computer. Set Print Using to "Star TSP143 (STR_T-001)."
- In the Default Printer dropdown menu, select "TSP654 (STR_T-001)."
Part 6: Change the printer settings and install a cash drawer
If you are using Safari:
- Log in to your system.
- Click on the Ticket
- Select Collect Payment
- Verify that the printer selected is TSP143 (STR_T-001). If it is not, then please see the section above to set it as the default printer.
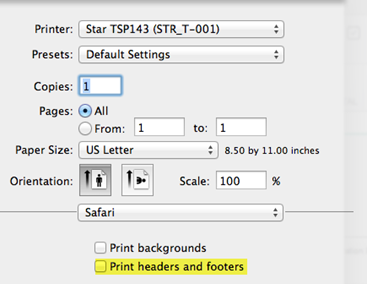
- Expand the printer window by clicking on the downward arrow on the right side of the box. The following settings only need to be set once (your printing page may look different than the examples below):
- Uncheck the "Print headers and footers" box.
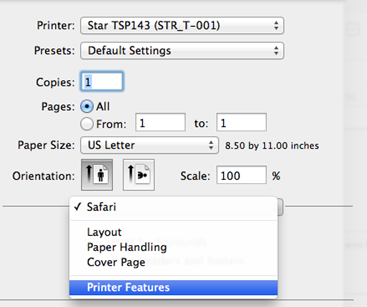
- Click on the menu titled Safari (within this print box), and select "Printer Features.
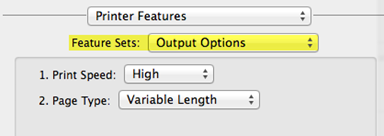
- From the Feature Sets menu, select "Output Options."
- From Page Type, select "Variable Length."
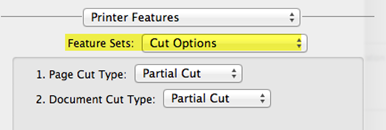
- From the Feature Sets drop down list, select "Cut Options."
- From Page Cut Type, select "Partial Cut."
- From Document Cut Type, select "Partial Cut."
- Cash drawer installation: If you purchased a cash drawer , select Cash Drawer Control from the Feature Sets dropdown list.
- From the Cash Drawer menu, select "Open Drawer 1."
- From the Cash Drawer 1 Pulse Width Menu, select "200 milliseconds."
- Verify that the cash drawer is plugged in to the back of the receipt printer.
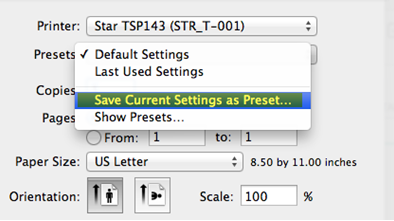
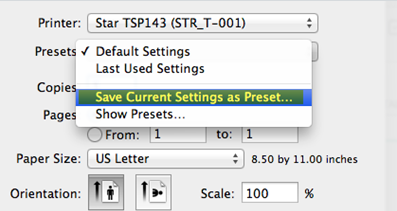
- Setting a Preset:
- From the Presets menu, select "Save Current Settings as Preset."
- Set a preset name.
- Click OK to save these settings as your receipt preset.
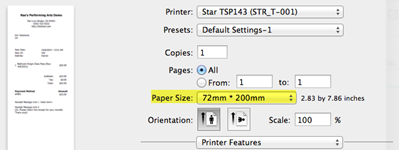
6. The following setting needs to be selected every time you print:
- From the Paper Size menu, select "72mm x 200mm."
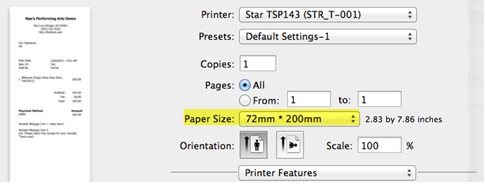
7. Click Print.
If you are using Firefox:
- Log in to your system.
- Click on the Manage tab and create a ticket .
- Select Collect Payment and click a Payment Method and Finish.
- Verify that the printer selected is TSP143 (STR_T-001). If it is not, then please see section above to set it as default.
- Click on Show Details to expand the printer window. (The following settings only need to be set once (your printing page may look different than the examples below):
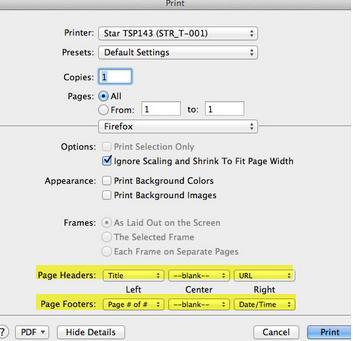
- Set all the headers and footers to "--blank--" using the dropdown menus.
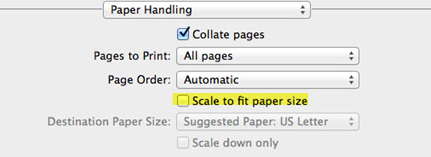
- Click on the menu titled Firefox (it is within this print box), and select Paper Handling.
- If the print is too small, check the box to "Scale to fit paper size."
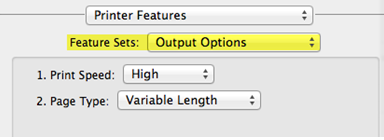
- Click on the menu again to select Printer Features.
- From the Feature Sets dropdown list, select "Output Options."
- From Page Type, select "Variable Length."
- From the Feature Sets dropdown list, select "Cut Options."
- From Page Cut Type, select "Partial Cut."
- From Document Cut Type, select "Partial Cut."
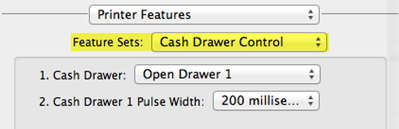
- Cash drawer installation: From the Feature Sets dropdown list, select "Cash Drawer Control" (skip these steps if you did not purchase a cash drawer from ).
- From the Cash Drawer menu, select "Open Drawer 1."
- From the Cash Drawer 1 Pulse Width Menu, select "200 milliseconds."
- Verify that the cash drawer is plugged in to the back of the receipt printer.
- Save settings as a Preset.
- From the Presets menu, select "Save Current Settings as Preset."
- Set a preset name.
- Click OK to save these settings as a receipt preset.
- The following setting needs to be selected every time you print:
- From the Paper Size menu, select "72mm x 200 mm"
- Click Print.
How do I know what version I have on my Mac computer?
- Click on the Apple icon on the top right of your browser.
- Select "About This Mac".