If you are looking to run your business from an iPad or Mobile device, you have the ability to connect your Star TSP100 Receipt printer to your WiFi connection in order to print receipts from that device wirelessly.
In order to connect your Star TSP100 Receipt printer to WiFi, you'll need a Star TSP143IIIW. (The TSP143IIIU is a USB only printer, and will not have a pairing button for you to simply connect to WiFi with.)
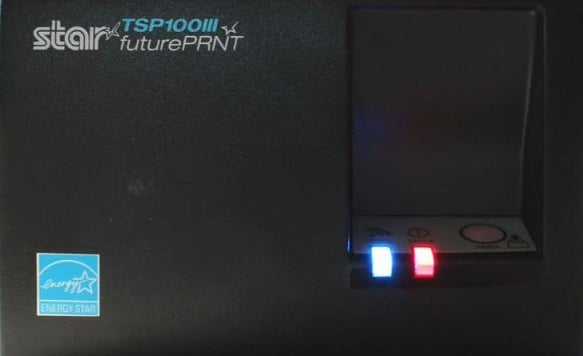
1. Plug your printer into it's power source (i.e wall outlet, power-bar, etc), and plug it's Ethernet cord into your cash drawer (if you have one). The blue and red lights on your printer should pop on briefly.
- If you do not have a cash drawer, you do not need to worry about using the Ethernet cord at all

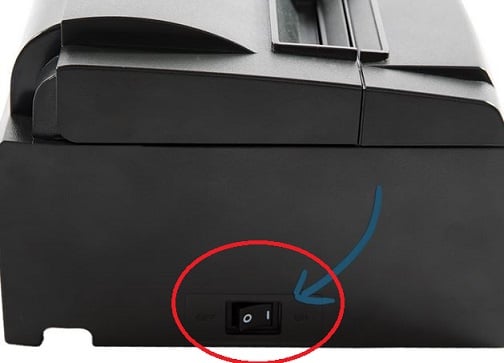
2. Turn power on by using the ON/OFF switch on the left side of the printer

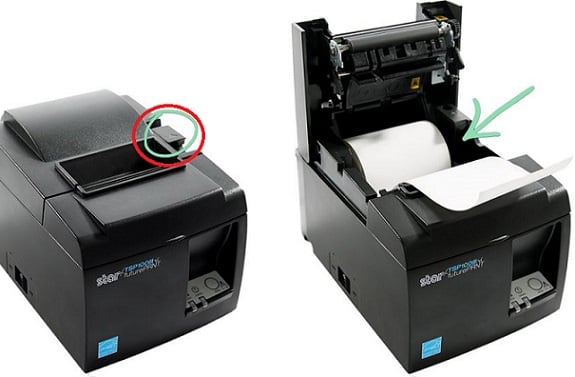
3. Make sure there is thermal receipt paper loaded in your printer.
- Using the lever on the top, right of the printer to open, load the paper with the roll facing upward. The paper should be coming out from underneath it's roll. Hold onto the paper as you close the printer's lid to ensure it spits out the paper evenly. (It could jam otherwise.)
- If you're unsure of what kind of thermal receipt paper to get, click here to order the correct kind!

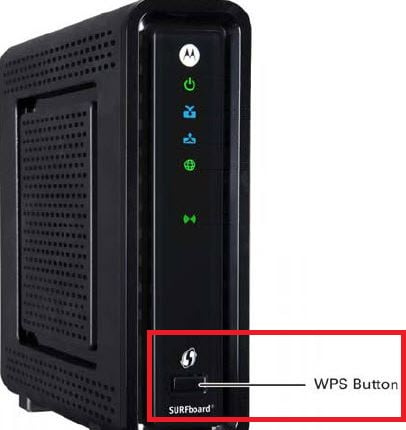
4. Locate and press the WPS button on your internet router

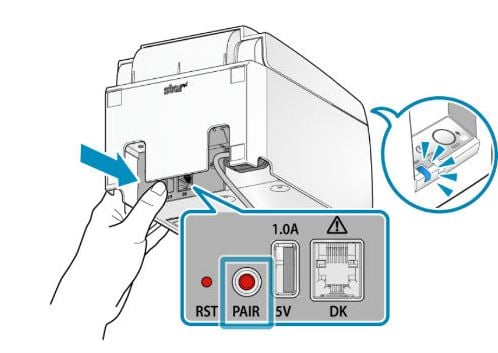
5. Next, locate the red "pair" button on the back, left, inside of the printer and press it, the blue "ready" light on the front will blink while connecting to your router

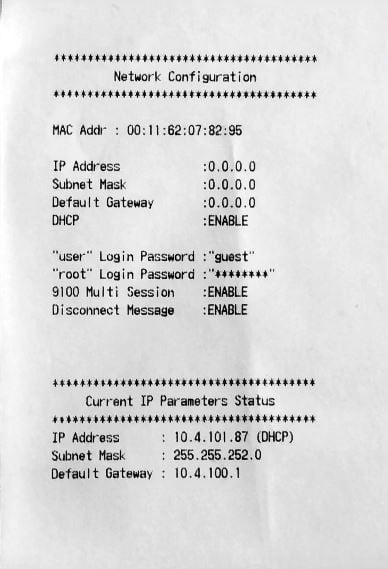
6. Once connected, a receipt will print showing your Network Settings
You're all set!
In order to connect your Star TSP100 Receipt printer to WiFi, you'll need a Star TSP143IIIW. (The TSP143IIIU is a USB only printer, and will not have a pairing button for you to simply connect to WiFi with.)
1. Plug your printer into it's power source (i.e wall outlet, power-bar, etc), and plug it's Ethernet cord into your cash drawer (if you have one). The blue and red lights on your printer should pop on briefly.
- If you do not have a cash drawer, you do not need to worry about using the Ethernet cord at all
2. Turn power on by using the ON/OFF switch on the left side of the printer
3. Make sure there is thermal receipt paper loaded in your printer.
- Using the lever on the top, right of the printer to open, load the paper with the roll facing upward. The paper should be coming out from underneath it's roll. Hold onto the paper as you close the printer's lid to ensure it spits out the paper evenly. (It could jam otherwise.)
- If you're unsure of what kind of thermal receipt paper to get, click here to order the correct kind!
4. Locate and press the WPS button on your internet router
5. Next, locate the red "pair" button on the back, left, inside of the printer and press it, the blue "ready" light on the front will blink while connecting to your router
6. Once connected, a receipt will print showing your Network Settings
You're all set!