- Wi-Fi
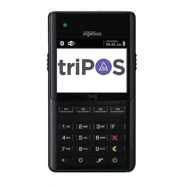
- Ingenico iSMP4
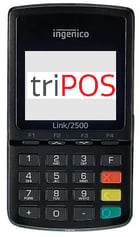
- Ingenico Link/2500
- Move 5000
- Follow below steps to configure WiFi:
- Boot up the device
- Press the F (Function button) 4 times RAPIDLY
- Select Access Points by pressing F4
- Select New by pressing F1 – Device will start scanning for Networks
- Device will list all available Wifi connections, press F1 or F3 to move up and down
- Once the correct Wifi is found, press the Green button
- Press Green button again
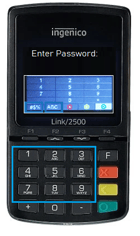
- Enter Wifi Password (T9 text), then press the Green button again
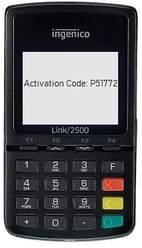
- Once successfully connected, device will display an Activation Code.
- Activate the terminal through MerchantTrack
To get started with your Link/2500 power the device on and allow it to boot up to the triPOS screen.
Tap 0-0-0-1
You will use the F2/F3 key to scroll to WIFI Parameters:
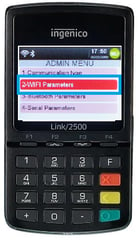
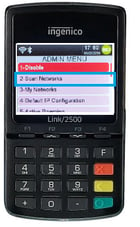
The second menu, you will select Scan Network.
Once the list of Networks have populated use the F2/F3 key to scroll and highlight your network.
When you have highlighted your network use the green button to select your network
You must now enter your WiFi password.
This can be done using multi-tap entry with the pin pad buttons, much like you enter text on a flip-phone (T-9) or use the Function (F) keys at the top to scroll the On-Screen keyboard.

-
(F1) - Scrolls the selection to the left
-
(F2) - Scrolls the selection up
-
(F3) - Scrolls the selection down
-
(F4) scrolls the Selection to the Right
Once the password is entered (Password is case sensitive) your device will show "New Profile OK" and will kick you back to the main screen where the wifi symbol should now be connected and green in the top left.
Once green, an activation code should populate on the screen.
If you do not get an activation code If plugged in: Press and hold the # and Yellow keys, the device will reboot.
If unplugged: the device will power down, power the device back on by holding the green key.
Tips The keypad uses multi-tap entry, for example, pressing the 2 button repeatedly will go through the number 2 and the letters a, b and c in both lower and upper case. To enter a symbol, press the symbol button (.,#*). To erase something typed, press the yellow button.
-
When needing to go back a previous screen, press the red button.
-
The chip reader should turn on automatically when connected to a power source.
-
Power down the device by holding the symbol button (.,#*) and the yellow button simultaneously.
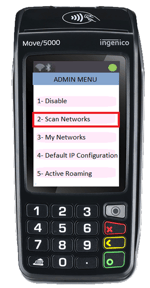
Ingenico Move 5000
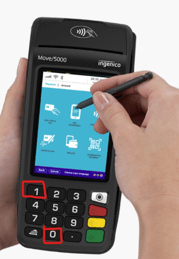
To connect the terminal to WiFi, power the device on and allow it to boot to the FULLSTEAM screen, once on this screen tap 0-0-0-1
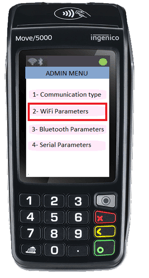
On the next screen you will select WIFI Parameters using the touch screen feature.
Select Scan Network. Once the list of Networks populates, select the network you are trying to connect
You will then need to enter your password, this can be done T-9 texting style by repeatedly tapping the numbers for the appropriate letters or you can use the touch screen for the keyboard.
Once the password is entered (Password is case sensitive) the device will show "New Profile OK" and will bring you back to the main screen where the wireless connection in the top left should turn green.
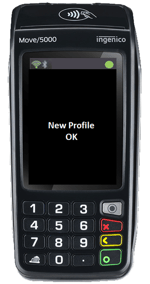
An activation code should populate on the screen. If not, press and hold the # and Yellow keys, the device will reboot (If plugged in, If unplugged the device will power down, power the device back on by holding the green key)
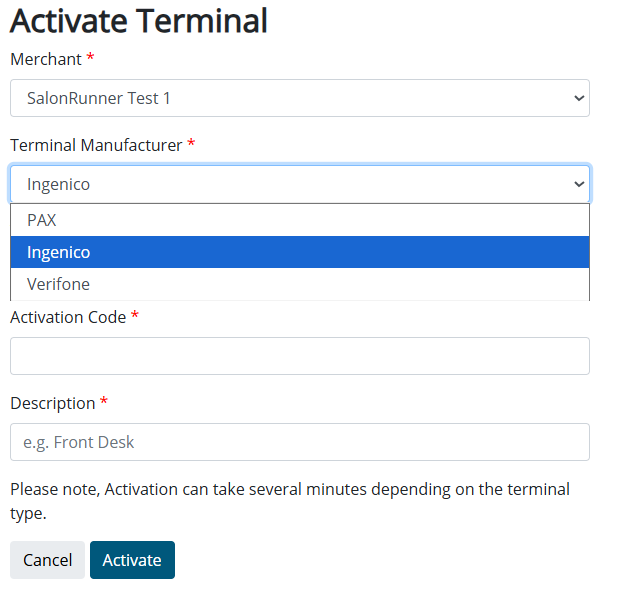
- Log into MerchantTrack, using the single sign on by loging into your Rosy Salon Software Account (manage>advanced settings>credit card processing>merchanttrack). You MUST have an email address in your Employee Profile in order for this to work. (manage>basic settings>employees)
- Click Terminals > Activate Terminal
- Use the dropdown to select a merchant. This should already be pre-configured for you, but if you do not see a merchant, contact RosyPay for assistance.
- Select your Terminal Manufacturer.
- PAX will be used for PAX Aries 8 & PAX A920 Pro
- Ingenico will be used for Link2500, ISMP4, Move5000, Lane3000, Lane7000
- Verifone will be used for MX915 & MX925
- PAX will be used for PAX Aries 8 & PAX A920 Pro
- Enter the Activation Code or Serial Number as requested by the terminal type. The Activation Code will displayed on the terminal after successfully connecting to WiFi
- Enter a brief description to help identify your terminal this will be the Name of the terminal displayed in Rosy Salon Software.
Once you have activated your terminal you will want to go back to Rosy Salon Software and refresh the Credit Card Processing page or go to manage>advanced settings>credit card processing here you will now see your activated cloud terminal and you are ready to start processing.

Checkout Using the Cloud Terminal