Resources refer to any special equipment or room needed to perform services, such as pedicure chairs, massage rooms, etc. The system keeps track of resource availability, and won’t book an appointment that requires a resource if it's already in use.
Start by going to:
Manage > Advanced Settings > Manage (under Resources)
Creating a New Resource:
1. Click "New Resource Group"
2. Choose the # of Resources available from the drop-down
3. Click Create
Once the Resource is created, you will be brought back to the main Resources page.
Assigning Resources to Services:
1. Remain on the main Resources page to start
2. Click the blue "Assign them to your Services" link at the top
3. Next to each Service that requires a resource, choose it's Resource from the drop-down
4. Click Save at the bottom
Note: Only one resource can be assigned to each service.
Editing Resources:
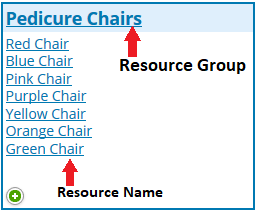
You can change the name of the Resource Group as a whole, change the name of individual Resources within each group, and add additional resources to particular groups

- To add more resources to a particular group, click the.png?width=21&name=rtaImage%20(1).png)
 icon
icon
- To rename the Resource Group itself, click the large name at the top of the box, then just adjust the name and click Save
- To rename the resources within the group, click on the name of the resource itself, adjust the name and click Save
Note: You cannot delete Resource Groups, but you can delete all resources within a group as long as there are no services assigned to them and no future appointments assigned to them.
Start by going to:
Manage > Advanced Settings > Manage (under Resources)
Creating a New Resource:
1. Click "New Resource Group"
2. Choose the # of Resources available from the drop-down
3. Click Create
Once the Resource is created, you will be brought back to the main Resources page.
Assigning Resources to Services:
1. Remain on the main Resources page to start
2. Click the blue "Assign them to your Services" link at the top
3. Next to each Service that requires a resource, choose it's Resource from the drop-down
4. Click Save at the bottom
Note: Only one resource can be assigned to each service.
Editing Resources:
You can change the name of the Resource Group as a whole, change the name of individual Resources within each group, and add additional resources to particular groups
- To add more resources to a particular group, click the
- To rename the Resource Group itself, click the large name at the top of the box, then just adjust the name and click Save
- To rename the resources within the group, click on the name of the resource itself, adjust the name and click Save
Note: You cannot delete Resource Groups, but you can delete all resources within a group as long as there are no services assigned to them and no future appointments assigned to them.